The Hot Spot Gold Bead Pheasant Tail
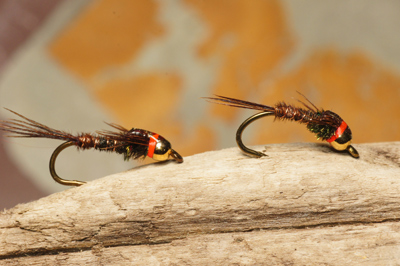
Hook: Daiichi 1120, 1250, 1560, #16-#10
Thread: MFC 8/0 or UTC 70 Hot Red, Orange or Chartreuse
Underbody: Uni Stretch, Hot Orange
Tail: Pheasant Tail Fibers
Rib: Fine Copper Wire
Body: Pheasant Tail Fibers
Wing Case: Pheasant Tail Fibers and Mirage Opal Mylar
Thorax: Peacock Herl
Legs: Pheasant Tail Fibers
Bead: Gold (Brass or Tungsten)
Tying Note: Coat wing case with a UV resin such as Loon's UV Clear Fly Finish-Thick
In the early 1900’s, famed river keeper Frank Sawyer created the Pheasant Tail Nymph for targeting trout on England’s River Avon. The original Pheasant Tail, as its name would suggest, was constructed entirely cock ring neck pheasant tail fibers. Frank Sawyer used fine copper wire as tying thread, adding not only durability but additional weight.
The original Pheasant Tail Nymph proved to be an exceptional pattern. Over time the Pheasant Tail Nymph migrated across the Atlantic Ocean to North America. The late Al Troth is credited with amending the original pheasant tail to include a peacock herl thorax.
Today, no fly box would be complete without a comprehensive selection of Pheasant Tail Nymphs. A Pheasant Tail Nymph is one of my favorite river or stream patterns. It is also an excellent lake pattern, particularly when Callibaetis nymphs are active. During my travels, flashback versions have also served me well when trout are focused on zoo plankton and small baitfish.
The modern Pheasant Tail seems a far cry from its original roots. Despite its simple lines there is lots of room for stamping your own personality to your Pheasant Tail Nymphs. Today, most Pheasant Tail variations feature a gold bead, either brass or tungsten depending upon where the fly will be used. Non bead head versions however, should still have a place within your fly box.
Pheasant Tail Nymphs can be tied on either standard or 2xl nymph hooks and curved scud pupa hooks. I tend to use standard shank hooks when using non bead head patterns and long shank hooks for bead head versions. Curved scud hooks do an excellent job suggesting the posture of a drifting nymph or when I suspend Pheasant Tails under an indicator on one of my favorite lakes.
Just about all of my Pheasant Tail Nymphs incorporate a pearlescent Mylar wing case or shellback. Standard pearl Mylar works fine but in recent years I favor mirage opal Mylar. The added Mylar flash does an excellent job suggesting the trapped gases many nymphs use to aid their emergence ascent and final transformation into winged adult. Many minnows feature dark bodies and a hint of belly flash. Once again, Flashback Pheasant Tails imitate this trait. A Mylar thorax version works as a small baitfish pattern. Flash also provides an element of attraction for a foraging trout to home in on, particularly in stained waters.
Many modern nymphs feature hot red, orange, chartreuse or pink hot spots. These hot spots help your nymphs stand out in a crowd drawing the attention of any opportunistic trout. I incorporate thread hot spots on most of my Pheasant Tails as I believe they make a difference. When trout are focused on minute zoo plankton a Flashback Pheasant Tail featuring a hot orange or chartreuse hot spot to mimic the predominant zoo plankton color has salvaged the day. For daphnia focused trout you can also incorporate a dubbed hot orange or chartreuse thorax.
Despite the Pheasant Tail’s simple slate of materials there are a few tricks that make life easier at the vise. Rather than trying to tie in the tail at precisely the right length I deliberately tie long tails. Initially secure the tail fibers using 2-3 wraps. Once secure, pull the tail to length. Add a few additional wraps of thread to lock the tail in place. Do not remove the excess material. Fold the excess back along the body and secure it back to the base of the tail. The excess pheasant tail will be used to form the body.
Pheasant tail bodies are not durable. To improve resilience coat the underbody thread wraps with brushable superglue. Counter wind the pheasant tail fibers forward to form the body. Tie off and remove the excess fibers. Spiral the ribbing forward using open even wraps. Tie off the ribbing. Use a pulling and twisting motion to break away the excess. When you tie off the rib the securing thread wraps cinch the rib tighter. Counter wound ribs can loosen, as the securing thread wraps push the smooth rib material back. A counter wound body results in a pattern capable of surviving a number of trout mauling's.
Consistent leg length can be an issue. When I first began tying Pheasant Tails and nymphs such as Half Backs standard practice involved factoring the leg length into the material measurement for the wing case. Once the wing case was complete the legs would be divided and folded back into position. This sounded good but in reality no two patterns seemed to have the same leg length.
To solve the leg length issue I came across a simple solution. Begin by tying in the legs at the head of the fly or rear of the bead so the tips protrude forward of the tie in point equal to the desired leg length. As with the tail, the leg fibers can be tied in long and pulled to length. Once in place, secure the remaining butts down the shank and onto the body slightly. With the thorax complete, divide the legs into two equal sections. Fold and hold one section down the far side of the thorax. Bind the far side leg fibers in place using a couple of thread wraps. Repeat this process to form the second set of legs down the near side of the thorax. Once the legs are complete, pull the pheasant tail butts over the thorax forming the wing case.
UV resin is now a standard wing case practice for all of my Pheasant Tail Nymphs. With the tying portion complete, place a small dab of resin onto the wing case. Keep the resin away from the legs. Allow the resin to settle, use a bodkin to disperse it as necessary. Use smooth movements to avoid creating air bubbles. If you need more resin add it in small amounts using your bodkin. The beauty of UV resins is you can take your time to ensure adequate disbursement of the product. Once the resin has settled into position activate it with the appropriate curing light.
The Pheasant Tail Nymph has come a long way since its simple origins. It has become a pattern of many faces and is a universal favorite. Many of the techniques used through this evolution, particularly reinforcing the pattern and ensuring consistent tail and leg length, can also be applied to other patterns. Give them a try as they might offer the solution you have been searching for.
To view the rest of this article, please login or join now for free!
|


